Introduction
Software isn't done when the code is working on your computer. It's not done when tests pass. And it's not done when someone gives you a "ship it" on code review. Software it's not done until you deliver it to the user.
Software delivery consist of all the work you need to do to make the code available to a customer, such as running that code on production servers, making the code resilient to outages and traffic spikes, and protecting the code from attackers.
The idea behind infrastructure as code(IaC) is that you write and execute code to define, deploy and update your infrastructure. This represents an important shift in mindset where you treat all aspects of operations as software - even those aspects that represents hardware. In fact, a key insight of DevOps is that you can manage almost everything in code, including servers, databases, networks, log files, application configuration, documentation, automated tests, deployment process and so on.
Terraform: Up and Running: Writing Infrastructure as Code by Yevgeniy Brikman
Nowadays, it is very common for developers to work on cloud environments; Amazon Web Services, Google Cloud, Microsoft Azure, etc. It's mainly because it is cheaper, not only do you pay for what you use, but you can focus on building project features, too, at the same time you forget about physical servers, hard-drives, wires, bandwidth, etc.
It doesn't mean that you completely forget about System Infrastructure, instead, you are provided with a set of services which you can handle via UI or software and it means that you need a new workforce with a strong understanding of these new platforms and services to actually reduce operational costs and increase productivity.
Terraform is a tool for building, changing, and versioning infrastructure safely and efficiently.
Terraform can manage existing and popular service providers as well as custom in-house solutions.
On this blog I'll focus on AWS and Terraform, I'm going to share a common use case where we need EC2 and RDS instances, but they should be running onto a secured VPC, public and private subnets, to comply with basic security practices.
Then I'm going to show an example on how I automated this scenario with a few variants as a template to help someone interested in Terraform.
Observe the benefits and the time consumed in tasks during the reading, so that you can decide whether IaC worth it.
Amazon Web Services
In order to use Terraform, you need a strong understanding of how AWS works. Fortunately, AWS docs are very useful most of the time. Here is the tutorial for this use case:
Tutorial: Create an Amazon VPC for Use with a DB Instance
Estimated time for entrance level: A couple of days
Estimated time for intermediate level: One day
Estimated time for senior level: 20-30 minutes
We all started to use AWS by reading a lot of documentation to get our systems up and running, that means we have been using the AWS Console/UI for a long time, now ask yourself;
Am I really a ninja AWS user?
If your answer is yes, now ask your self;
Am I using only AWS Console/UI?
If your answer is yes, You aren't a ninja AWS user yet
If you answer is No for the AWS Console/UI, that means you are using the AWS CLI or Cloud Formation, etc, and you really understand what you are doing,
Being able to complete a tutorial by reading the docs doesn't make you a ninja AWS user, don't get me wrong, I'm trying to change your mindset about how you are using this platform so that you can become a ninja operations developer as Yevgeniy Brikman said
"treat all aspects of operations as software".
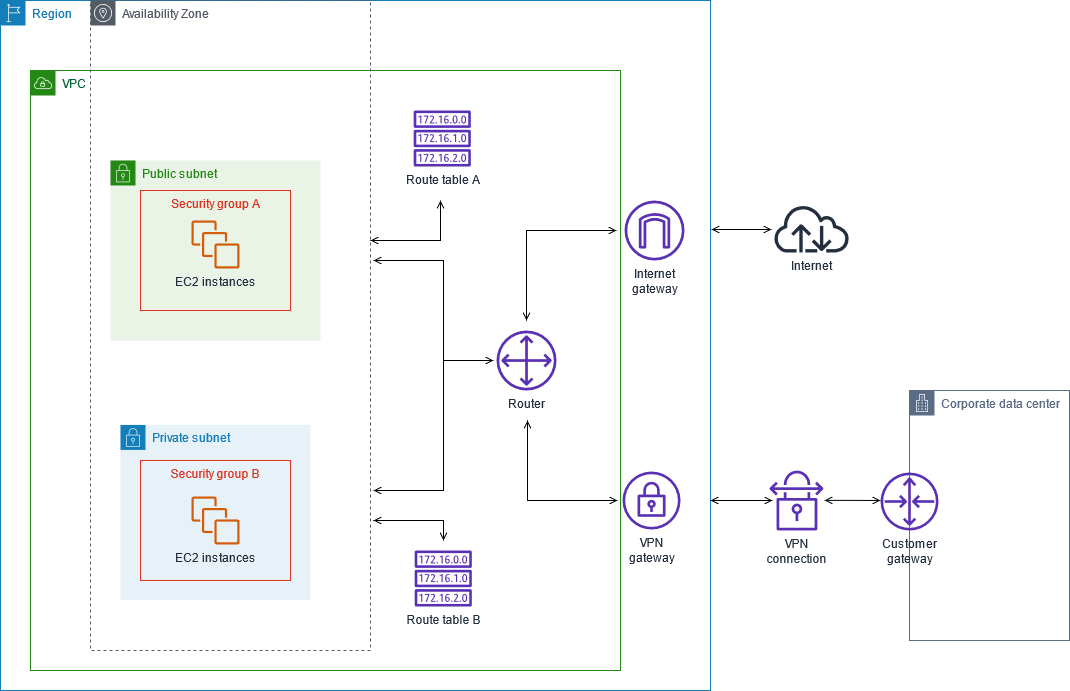
In my opinion the hardest part is the network that involves the VPC, subnets, subnets groups, internet gateways and route tables, here you can learn more about it
VPC Route Tables
Either you answered Yes or No, please share your opinion in the comments section.
To summarize this use case it creates at the end:
- 1 VPC
- 1 Internet gateway
- 2 Route Tables
- 1 Public Subnet
- 2 Private Subnet
- 1 Web Security Group
- 1 DB Security Group
- 1 DB Subnets group
- 1 RDS Instance
- 1 NAT EC2 Instance
- 1 Web Ec2 Instance
I can't go through all the services since it would be a huge post, so if you are interested in how they work, just google it up..
To finish the AWS section, think about this: there is no evidence on how you build the cloud system besides the tutorial, and it's pretty basic, so if you or anyone else modifies the subnets or security groups in order to have the system grow, it will be very hard to identify when and how they did it, it will also get hard to replicate it multiple times.
Not having a good way of tracking infra operational changes, additions or lack of automation does not seem so ninja.
Terraform EC2 & RDS
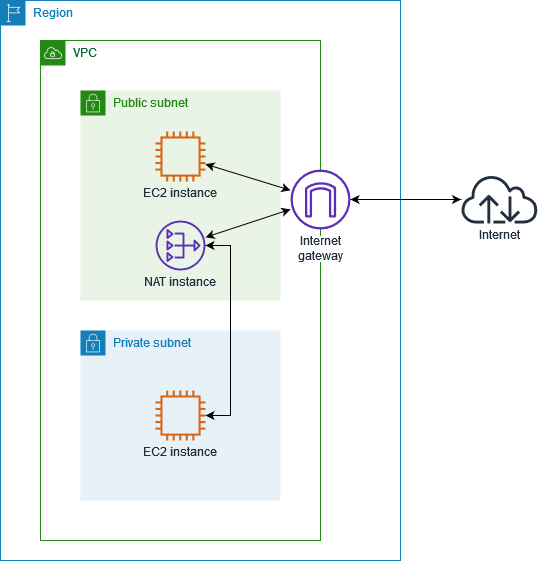
The next diagram shows what we want to accomplish.
- 1 VPC
- 1 Internet gateway
- 2 Route Tables
- 2 Public Subnet
- 2 Private Subnet
- 1 Web Security Group
- 1 DB Security Group
- 1 DB Subnets group
- 1 RDS Instance
- 1 NAT EC2 Instance
- 1 Web Ec2 Instance
1) We need a user account/profile to create the services so it needs an access key.
- Login into AWS and go to Identity and Access Management (IAM) -> Users -> Add User
- Add user name: terraform
- Select Access type: Programmatic access
- Next
- Permissions -> Attach existing policy -> Select AdministratorAccess
- Next
Review
Download the csv with the access key, if you lose them you need to create a new one.
Then attach your credentials to your aws credentials file, you need to have
AWS CLI installed and verify your config is pointing to the right region.
$ cat .aws/credentials
[terraform-sample]
aws_access_key_id = xxxxxxxxxxxxxxxxxxxxxx
aws_secret_access_key = xxxxxxxxxxxxxxxxxxxxxx
$ cat .aws/config
[default]
output = json
region = us-east-1
2) In order to access to the EC2 instance we need to create a key pair
- Go to EC2 Service -> Key Pair -> Create Key Pair
- Name: terraform_key
It will download a .pem file, then again, if you lose it, you’ll need to create a new one.
3) Create a working directory, mine is terraform-blog and then create 2 files
- myproject.tf
- system.tfvars
$ touch myproject.tf & touch system.tfvars
Variable Definitions (.tfvars) File
To set lots of variables, it is more convenient to specify their values in a variable file and then specify that file on the command line with -var-file:
$ terraform apply -var-file="testing.tfvars"
A variable definitions file uses the same basic syntax as Terraform language files, but it only consists of variable name assignments:
aws_region = "us-east-1"
aws_profile = "sample"
Within the module that declared a variable, its value can be accessed from within expression as `var.<NAME>` where `<NAME>` matches the label given in the declaration block:
variable "aws_profile" {}
provider "aws" {
profile = "${var.aws_profile}"
region = "${var.aws_region}"
}
Open system.tfvars and replace with your values
aws_profile = "terraform-sample"
aws_region  = "us-east-1"
environment = "staging"
key_name    = "terraform_key"

default_cidr_block = "0.0.0.0/0"
default_vpc_cidr_block = "10.0.0.0/16"

db_username = "sample"
db_password = "sample"

subnet_cidrs_public =  {
  default = ["10.0.0.0/16", "10.0.1.0/16"]
  type = "list"
}
Data Sources
A data source is accessed via a special kind of resource, known as a “data resource”, which is declared by using a data block.
data "aws_ami" "example" { most_recent = true }
resource "aws_instance" "web" {
ami = data.aws_ami.example.id
}
A data block requests that Terraform reads from a given data source, "aws_ami", and exports the result under the given local name.
AWS Provider
The Amazon Web Services (AWS) provider is used to interact with the many resources supported by AWS. The provider needs to be configured with the proper credentials before it can be used.
Resources
Resource declarations can include a number of advanced features, but only a small subset are required for initial use.
resource "aws_instance" "web" {
ami = "ami-a1b2c3d4"
}
Open myproject.tf here comes the magic!
variable "aws_profile" {}
variable "aws_region" {}
variable "environment" {}
variable "key_name" {}


variable "default_cidr_block" {}
variable "default_vpc_cidr_block" {}

variable "db_username" {}
variable "db_password" {}

variable "subnet_cidrs_public" {}

provider "aws" {
  profile    = "${var.aws_profile}"
  region     = "${var.aws_region}"
}

# aws_availability_zone comes from aws provider, it can vary depending on the region
# us-east-1, us-east-2

data "aws_availability_zones" "available" {}


# Define VPC, it lets you provision a logically isolated section of the AWS Cloud where you can
# launch AWS resources in a virtual network that you can define.

resource "aws_vpc" "vpc" {
  cidr_block = "${var.default_vpc_cidr_block}"

  tags = {
    Name = "Myproject ${var.environment} vpc"
  }
}


# Define Internet Gateway is a horizontally scaled, redundant, and highly available VPC
# component that allows communication between instances in your VPC and the internet.

resource "aws_internet_gateway" "gateway" {
  vpc_id = "${aws_vpc.vpc.id}"

  tags = {
    Name = "Myproject ${var.environment} internet gateway"
  }
}

# Define Route Tables contains a set of rules that are used to determine where network traffic
# is directed, each subnet in your VPC must be associated with a route table.
# VPC always creates a route table by default
# default route table will be for private subnets
# So we need to create a new one for public subnets


resource "aws_route_table" "public" {
  vpc_id = "${aws_vpc.vpc.id}"

  route {
    cidr_block = "${var.default_cidr_block}"
    gateway_id = "${aws_internet_gateway.gateway.id}"
  }

  tags = {
    Name = "Public ${var.environment} Route Table"
  }
}


# You can determine how many subnets and which ones are explicitly associated with a route table
# So we associate public subnets with the previous public route table

resource "aws_route_table_association" "public" {
  count = "${length(var.subnet_cidrs_public)}"

  subnet_id      = "${element(aws_subnet.public.*.id, count.index)}"
  route_table_id = "${aws_route_table.public.id}"
}

# We use the default vpc route table private to associate it with the nat instance

resource "aws_route" "default" {
  route_table_id  = "${aws_vpc.vpc.default_route_table_id}"
  instance_id     = "${aws_instance.nat.id}"
  destination_cidr_block  = "${var.default_cidr_block}"
}

# Define security groups for web servers

resource "aws_security_group" "web" {
  name        = "myproject_security_group"
  description = "Myproject security group"
  vpc_id      = "${aws_vpc.vpc.id}"

  ingress {
      from_port = 80
      to_port = 80
      protocol = "tcp"
      cidr_blocks = ["${var.default_cidr_block}"]
  }

  ingress {
      from_port = 443
      to_port = 443
      protocol = "tcp"
      cidr_blocks = ["${var.default_cidr_block}"]
  }

  ingress {
      from_port = 22
      to_port = 22
      protocol = "tcp"
      cidr_blocks = ["${var.default_cidr_block}"]
  }
  egress {
    from_port   = 0
    to_port     = 0
    protocol    = "-1"
    cidr_blocks = ["${var.default_cidr_block}"]
  }

  tags = {
    Name = "Web ${var.environment} security group"
  }
}

# Setting up the public subnets with the cird_blocks and availability zones

resource "aws_subnet" "public" {
  count                   = "${length(data.aws_availability_zones.available.names)}"
  vpc_id                  = "${aws_vpc.vpc.id}"
  cidr_block              = "10.0.${count.index}.0/24"
  map_public_ip_on_launch = true
  availability_zone       = "${element(data.aws_availability_zones.available.names, count.index)}"

  tags = {
    Name = "public-${element(data.aws_availability_zones.available.names, count.index)}"
  }
}

# Setting up the private/rds subnets with the cird_blocks and availability zones

resource "aws_subnet" "rds" {
  count                   = "${length(data.aws_availability_zones.available.names)}"
  vpc_id                  = "${aws_vpc.vpc.id}"
  cidr_block              = "10.0.${length(data.aws_availability_zones.available.names) + count.index}.0/24"
  map_public_ip_on_launch = false
  availability_zone       = "${element(data.aws_availability_zones.available.names, count.index)}"
  tags = {
    Name = "rds-${element(data.aws_availability_zones.available.names, count.index)}"
  }
}

# Define RDS subnet group it needs at least two subnets
# And this depends on the rds subnets creation

resource "aws_db_subnet_group" "default" {
  name        = "${var.environment}-database-subnet-group"
  description = "RDS subnet group"
  subnet_ids  = [aws_subnet.rds[0].id, aws_subnet.rds[1].id]
  depends_on  = [aws_subnet.rds]
}

# Define security groups for rds instance

resource "aws_security_group" "rds" {
  name        = "${var.environment}-myproject-rds-security-group"
  description = "RDS MySQL server"
  vpc_id      = "${aws_vpc.vpc.id}"
  ingress {
    from_port       = 3306
    to_port         = 3306
    protocol        = "tcp"
    security_groups = ["${aws_security_group.web.id}"]
  }
  egress {
    from_port   = 0
    to_port     = 0
    protocol    = "-1"
    cidr_blocks = ["${var.default_cidr_block}"]
  }
  tags = {
    Name = "Myproject ${var.environment} rds security group"
  }
}

# Define web server instance, ami, type, subnet, security group, key name.
# Key name is very important so that you can login into the instances

resource "aws_instance" "web_server" {
  ami           = "ami-09eb5e8a83c7aa890"
  instance_type = "t2.nano"
  key_name      = "${var.key_name}"
  subnet_id     = "${aws_subnet.public[0].id}"
  associate_public_ip_address = true
  vpc_security_group_ids = ["${aws_security_group.web.id}"]

  tags = {
    Name = "Myproject ${var.environment} web server"
  }
}

# Define nat server instance, ami, type, subnet, security group

resource "aws_instance" "nat" {
   ami = "ami-0d4027d2cdbca669d"
   instance_type = "t2.nano"
   key_name      = "${var.key_name}"
   vpc_security_group_ids = ["${aws_security_group.web.id}"]
   subnet_id     = "${aws_subnet.public[0].id}"
   associate_public_ip_address = true

   tags = {
       Name = "VPC ${var.environment} NAT"
   }
}

# Define RDS instance db engine, type, subnet, security group, credentials
# depends on aws_db_subnet_group creation

resource "aws_db_instance" "default" {
  identifier                = "myproject-database"
  allocated_storage         = 5
  engine                    = "mysql"
  engine_version            = "5.7.22"
  instance_class            = "db.t2.micro"
  name                      = "myproject_${var.environment}"
  username                  = "${var.db_username}"
  password                  = "${var.db_password}"
  db_subnet_group_name      = "${aws_db_subnet_group.default.id}"
  vpc_security_group_ids    = ["${aws_security_group.rds.id}"]
  skip_final_snapshot       = true
  final_snapshot_identifier = "Ignore"
  depends_on  = [aws_db_subnet_group.default]
}
4) Init terraform
- terraform init
$ terraform init

Initializing the backend...

Initializing provider plugins...
- Checking for available provider plugins...
- Downloading plugin for provider "aws" (terraform-providers/aws) 2.19.0...

The following providers do not have any version constraints in configuration,
so the latest version was installed.

To prevent automatic upgrades to new major versions that may contain breaking
changes, it is recommended to add version = "..." constraints to the
corresponding provider blocks in configuration, with the constraint strings
suggested below.

* provider.aws: version = "~> 2.19"

Terraform has been successfully initialized!

You may now begin working with Terraform. Try running "terraform plan" to see
any changes that are required for your infrastructure. All Terraform commands
should now work.

If you ever set or change modules or backend configuration for Terraform,
rerun this command to reinitialize your working directory. If you forget, other
commands will detect it and remind you to do so if necessary.
5) Apply terraform to create resources
terraform apply -var-file=system.tfvars
Build Resources
Estimated time: 3 minutes
To destroy resources
terraform destroy
6) Login on EC2 and RDS and verify security subnets
I) Verify RDS from internet, it should not be accessible, only thru the web EC2 or NAT
- Go to RDS search the database and get the endpoint
mysql -h example-database.caoygfnheo01.us-west-1.rds.amazonaws.com -P 3306 -u db_username -p
- You should not have access.
II) Verify from web EC2
- Be sure pem file has right permissions 400
- Get the EC2 ip address
$ ssh -i "terraform_key.pem" ubuntu@XX.XX.XX.XXX
- You should have access, now try to login into RDS
mysql -h example-database.caoygfnheo01.us-west-1.rds.amazonaws.com -P 3306 -u db_username -p
- You should have access from the web EC2 since the subnets are routed on the sample VCP.
Notes
It took around 2 days to build the .tf file correctly, but now it can be reused for anyone and many times. In order to work as a team, we need the
terraform.tfstate which isn't covered here - nor terraform modules.
Conclusion
By looking at the terraform files, we got a better understanding of the resources we need and how they are mixed for building systems. Also, it's automated and reusable. You can create or destroy resources in minutes by just using one command or updating the resources via code and track every change very easy, as well.
Hope you enjoy it, if you need help please send a message!